yatocRpyatocRp
Ce post n’existe pas en Français… This post is just “Yet Another Tutorial on Creating R Packages” (on Linux). It should not be seen as a real tutorial, merely as a very short overview on the process of building packages. For more complete tutorials, see
- in French: Genolini’s tutorial;
- in English: Leisch’s tutorial, Yan and Rossini’s tutorial or Gravesand Dorai-Raj’s tutorial (PDF).
The functions described in this post are used as a simple case example to explain the full process of creating R packages on Linux. As a result, we will obtain this graphical interface
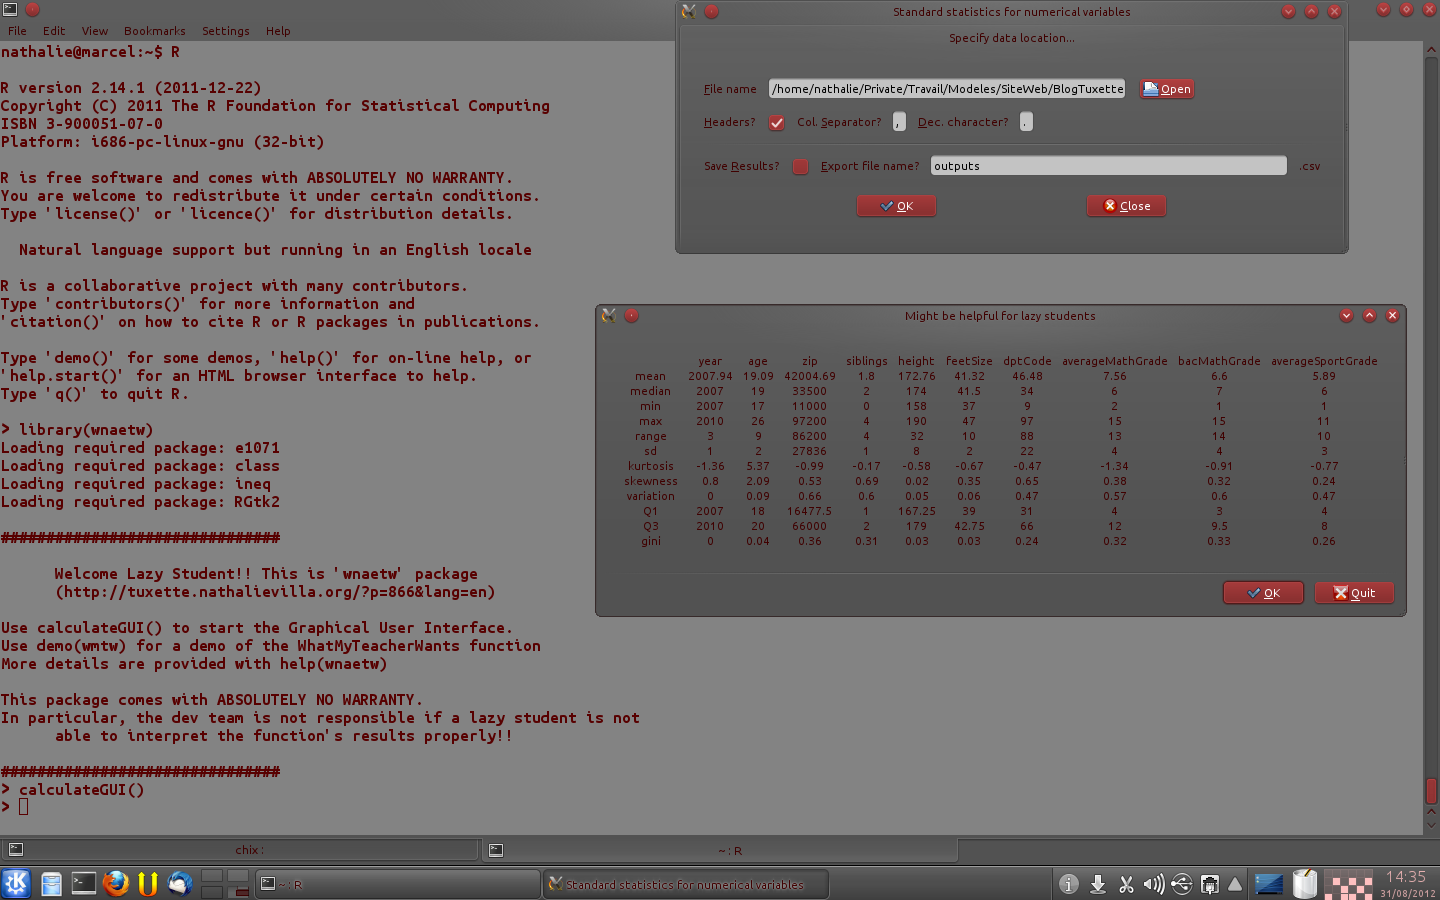
that allows the user to read a CSV file and obtain basic statistics on the numeric variables included in. People (i.e., lazy students) only interested in using this package named “wnaetw” can skip the technical part and directly download the package at the bottom of this page.
Menu
Prepare the package
Start a fresh R session and source all functions that you want to include in the package. You can also include datasets in your package by loading them in the workspace. Once this is done, use the function
package.skeleton(name="wnaetw")
that will create a folder wnaetw in R working directory. This folder contains everything needed to build a package:
-
a file
DESCRIPTIONthat contains the package description. Edit it to provide information on your package. In particular, the fieldMaintainerhas to be fullfiled with care (and with a valid email address in case you want to use the Windows compiler to build a Windows version of your package). The description file of the packagewneatwis:Package: wnaetw Type: Package Title: What Nicolas's Teacher Wants Version: 1.0 Date: 2012-08-31 Author: Nicolas A. Edwards, Arthur Gomez, Jonathan Mahe and Nathalie Villa-Vialaneix Maintainer: Nathalie Villa-Vialaneix Description: This package does what Nicolas's teacher wants with numerical variables. It seems pretty clear with just the title License: WTFPL (>=2.0) Depends: e1071, ineq, graphics, stats, RGtk2 SystemRequirements: Cairo (>= 1.0.0), ATK (>= 1.10.0), Pango (>= 1.10.0), GTK+ (>= 2.8.0), GLib (>= 2.8.0)
-
a file
NAMESPACEthat you have to edit to add package dependencies. In my case, the package requires the packagese1071,ineqandRGtk2. Also, as the functionsplotandmeanare used so the standard packagesstatsandgraphicsare needed. Packages dependencies are specified by the following line:import(ineq,e1071,graphics,stats,RGtk2)
-
a folder
Rwith the functions’ scripts. In this folder, I added a scriptinit.Rthat contains a welcome message printed on screen when the package is loaded. This script contains:.onAttach = function(libname, pkgname){ packageStartupMessage("") packageStartupMessage("###############################") packageStartupMessage("") packageStartupMessage(" Welcome Lazy Student!! This is 'wnaetw' package") packageStartupMessage(" (http://tuxette.nathalievialaneix.eu/?p=866&lang=en)") packageStartupMessage("") packageStartupMessage("Use calculateGUI() to start the Graphical User Interface.") packageStartupMessage("Use demo(wmtw) for a demo of the WhatMyTeacherWants function") packageStartupMessage("More details are provided with help(wnaetw)") packageStartupMessage("") packageStartupMessage("This package comes with ABSOLUTELY NO WARRANTY.") packageStartupMessage("In particular, the dev team is not responsible if a lazy student is not") packageStartupMessage(" able to interpret the function's results properly!!") packageStartupMessage("") packageStartupMessage("###############################") } -
a folder
datawhere the data are saved as separatedrdafiles; -
a folder
manwith the functions’, the datasets’ and the package’s help pages. All these files must be edited and filled in to describe the package, the functions and the datasets. Example of such documentation files can be found in the foldermanby uncompressing the archive of the package source.
Additionally,
-
the folder
instcan be used to put whatever you want. I used it to provide the “student” dataset (coming from my yearly student surveys) as a CSV file in a sub-folder namedcsv-data/; -
a folder
democan be used to put demos: demos are provided as script files that will be run and printed on screen altogether. This folder must contain a file named00Indexwith the demo’s names and descriptions (see also the package source); -
a
NEWSfile can be added to describe the versions history.
Build and check the package
Once your package is ready, it has to be built. This is done by using the following command line in the directory that contains your package’s folder:
R CMD build wnaetw
A filewnaetw_1.0.tar.gzshould be created. You can then check that your package contains no major mistake by
R CMD check wnaetw_1.0.tar.gz
(this can take a while). In my case, this resulted in one warning:
WARNING: There was 1 warning, see
  ‘..../wnaetw.Rcheck/00check.log’
for details
due to
* checking DESCRIPTION meta-information ... WARNING
Non-standard license specification:
  WTFPL (>=2.0)
Standardizable: FALSE
because only GPL licence should be used to publish your package on CRAN (but this package is not supposed to be uploaded on CRAN so I used the famous Do What The Fuck You Want To Public License for this package. You can find in the directory wnaetw.Rcheck useful information such as, the PDF manual or the final form of the package (among other interesting files that you can check before installing the package).
At this step, if everything is ok, your package is ready to be installed on a linux computer:
R CMD INSTALL wnaetw_1.0.tar.gz --html
(the option --html is used to install HTML documentation in case it is not your default documentation).
Mac users…
… can compile the package from source by the same command line if XCode is installed on their OS.
Windows users…
… can also probably compile the package from source but this post doesn’t explain how (RTFM). However, if you have a package built on a Linux system, you can obtain windows binary by uploading it on the CRAN windows builder.
Install the package
The package is now ready for use. Do you want to install it on your computer, lazy student?
wnaetw: What Nicolas’s Teacher Wants
This package does what Nicolas’s teacher wants with numerical variables. It seems pretty clear with just the title.
Version: 1.0
Date: 2012-08-31
Author: Nicolas A. Edwards, Arthur Gomez, Jonathan Mahe and Nathalie Villa-Vialaneix
Maintainer: Nathalie Villa-Vialaneix <nathalie@nathalievialaneix.eu>
License: WTFPL (>=2.0)
Depends: e1071, ineq, graphics, stats, RGtk2
SystemRequirements: Cairo (>= 1.0.0), ATK (>= 1.10.0), Pango (>= 1.10.0), GTK+ (>= 2.8.0), GLib (>= 2.8.0)
Installation: wnaetw installation info
CRAN checks: wnaetw results
Downloads:
Package source: wnaetw_1.0.tar.gz
MacOS X binary: wnaetw_1.0-mac.tar.gz
Windows binary: wnaetw_1.0.zip
Reference manual: wnaetw.pdf
Use the package on:
-
Linux
a proper Gtk environment has to be installed, which is generally the case on most linux systems. Thus, you probably just have to install the
RGtk2package (and the other packages listed inDependsby the following command line:sudo apt-get install r-cran-rgtk2
(it will install the Gtk environment on your system as well, if you don’t already have it). Then use the package source above with the command
R CMD INSTALL --html wnaetw_1.0.tar.gz
-
Windows
(thank you NiLeDAM for installing and testing another similar package on your computer, for checking the procedure and for pointing out a few bugs…)
Installation on windows is a bit trickier (how surprising!…). You first have to download (exe, 6 Mo) the automatic installer for the GTK runtime. Then start R and install all required packages from CRAN, including
RGtk2. Try to loadRGtk2library(RGtk2)
at this step, you can have the following error
Error in inDL(x, as.logical(local), as.logical(now), ...) :
  unable to load shared object
'.../R/R-2.15.1/library/RGtk2/libs/i386/RGtk2.dll':
  LoadLibrary failure:  La procédure spécifiée est introuvable.
(in French); if this happens accept what it asks to download and once it’s done (downloaded and installed), restart R and try again: you should not have this message anymore. Finally install the package
wnaetwfrom windows binary above.</li> -
Mac OS X
(thank you Nicolas for building the package for Mac and for testing it on your computer)
To install
RGtk2on Mac OS X, you first need to install a proper Gtk+ environment. Several methods exist but the simplest is certainly to use the pre-compiled Gtk+ framework that can be found here (requires Mac OS X 10.5 (Leopard) or higher). If your OS is Mac OS X Lion or higher, you first need to install X11 (see here). Then install all required packages from CRAN and finally, install the packagewnaetwfrom Mac OS X binary provided above.</li> </ul>Finally, start R, write out
library(wnaetw)
calculateGUI()
Happy? 😉
</div>
Construire une interface utilisateur simple avec RGtk2Build a simple GUI with RGtk2
This post is a very basic introduction to the RGtk2 package which provides facilities in the R language for programming graphical interfaces using Gtk, the Gimp Tool Kit.
Some of my students were smart enough to program a script that takes as input a numerical variable and gives as outputs standard numerical statistics requested by the teachers for their statistics projects. Taking this script as an example (thank you Nicolas and Arthur Padawan for sending me your scripts), I describe how to create a GUI interface that takes as an input the name of a CSV data file and pop up a window with the most standard numerical statistics for the numerical variables included in the data file. The GUI interface also allows the user to save the results in a CSV file.
Required
To make all this work, you need:
- three R libraries: RGtk2 (of course, as this tutorial is about using this package), e1071 (required for the calculation of Kurtosis and skewness indexes) and ineq (for the calculation of Gini index)
- the “WhatMyTeacherWants” script, that all my students should have for their statistics project
WhatMyTeacherWants = function(x){
	res = c(
		round(mean(x, na.rm=TRUE), digits=2),
		round(median(x, na.rm=TRUE), digits=2),
		round(min(x, na.rm=TRUE), digits=2),
		max(x, na.rm=TRUE),
		max(x, na.rm=TRUE)-min(x, na.rm=TRUE),
		round(sd(x, na.rm=TRUE)),
		round(kurtosis(x, type=1,na.rm=TRUE), digits=2),
		round(skewness(x, type=1, na.rm=TRUE), digits=2),
		round(mean(x)/sd(x), digits=2),
		round(quantile(x,probs=c(0.25,0.75), na.rm=TRUE), digits=2),
		round(ineq(x),2))
	names(res) = c("mean","median","min","max","range","sd","kurtosis","skewness","variation","1st quantile","3rd quantile","gini")
	res
}
- the example data file (that is actually the famous iris dataset).
Create the input window
First step is to create the input window with data file information and options for choosing to save (or not) results:
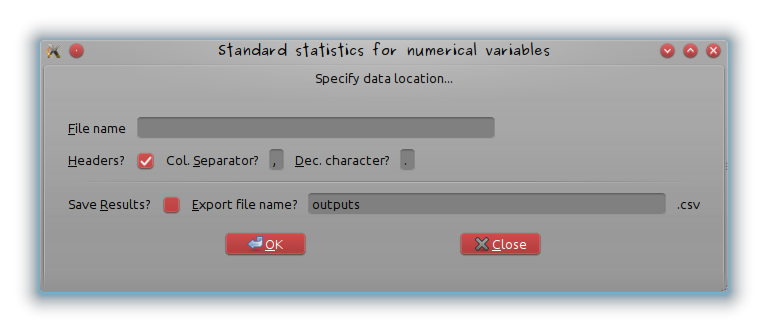
First the window is created and its name added:
# Create window
window = gtkWindow()
# Add title
window["title"] = "Standard statistics for numerical variables"
Then, even if this is not mandatory (it’s prettier), a frame is inserted in the window
# Add a frame
frame = gtkFrameNew("Specify data location...")
window$add(frame)
A vertical container is inserted in the frame so that several widgets can be added and for every widget line, a horizontal container is created and added to the vertical container:
# Create vertical container for file name entry
vbox = gtkVBoxNew(FALSE, 8)
vbox$setBorderWidth(24)
frame$add(vbox)
# Add horizontal container for every widget line
hbox = gtkHBoxNew(FALSE, 8)
vbox$packStart(hbox, FALSE, FALSE, 0)
The first element of the first line is a label “Filename” and the second element of the first line is a entry box where the user will write its file’s name (and directory if needed). The entry is given the name filename that will be passed to the program when clicking on “OK” and is accessed by using “Alt+F” (look at underscored F; it’s done by the function gtkLabelNewWithMnemonic and the attribute setMnemonicWidget). The number of characters of the text field is limited to 50.
label = gtkLabelNewWithMnemonic("_File name")
hbox$packStart(label,FALSE,FALSE,0)
# Add entry in the second column; named "filename"
filename = gtkEntryNew()
filename$setWidthChars(50)
label$setMnemonicWidget(filename)
hbox$packStart(filename,FALSE,FALSE,0)
The following lines are almost the same with checkboxes (that can be set to “check” by default using the option active) and default value for the text fields set by the option setText
# Add an horizontal container to specify input file options
# are headers included in the file?
hbox = gtkHBoxNew(FALSE,8)
vbox$packStart(hbox, FALSE, FALSE, 0)
label = gtkLabelNewWithMnemonic("_Headers?")
hbox$packStart(label,FALSE,FALSE,0)
headersEntry = gtkCheckButton()
headersEntry$active = TRUE
hbox$packStart(headersEntry,FALSE,FALSE,0)
label$setMnemonicWidget(headersEntry)

# are headers included in the file?
label = gtkLabelNewWithMnemonic("Col. _Separator?")
hbox$packStart(label,FALSE,FALSE,0)
sepEntry = gtkEntryNew()
sepEntry$setWidthChars(1)
sepEntry$setText(",")
hbox$packStart(sepEntry,FALSE,FALSE,0)
label$setMnemonicWidget(sepEntry)

# what's the character used for decimal points?
label = gtkLabelNewWithMnemonic("_Dec. character?")
hbox$packStart(label,FALSE,FALSE,0)
decEntry = gtkEntryNew()
decEntry$setWidthChars(1)
decEntry$setText(".")
hbox$packStart(decEntry,FALSE,FALSE,0)
label$setMnemonicWidget(decEntry)

# Add separator
vbox$packStart(gtkHSeparatorNew(), FALSE, FALSE, 0)

# Add two horizontal containers to check if the results have to be exported in a file and if so, to specify the file's name
hbox = gtkHBoxNew(FALSE,8)
vbox$packStart(hbox, FALSE, FALSE, 0)
label = gtkLabelNewWithMnemonic("Save _Results?")
hbox$packStart(label,FALSE,FALSE,0)
toSave = gtkCheckButton()
hbox$packStart(toSave,FALSE,FALSE,0)
label$setMnemonicWidget(toSave)
label = gtkLabelNewWithMnemonic("_Export file name?")
hbox$packStart(label,FALSE,FALSE,0)
exportFileName = gtkEntryNew()
exportFileName$setWidthChars(50)
exportFileName$setText("outputs")
hbox$packStart(exportFileName,FALSE,FALSE,0)
label$setMnemonicWidget(exportFileName)
label = gtkLabel(".csv")
hbox$packStart(label,FALSE,FALSE,0)
The windows ended with buttons: “OK” is used to call WhatMyTeacherWants on the numerical variables of the data frame and “Close” to quit the GUI. It’s done by the function gSignalConnect whose last argument is the application called when clicking.
# Add button
the.buttons = gtkHButtonBoxNew()
the.buttons$setBorderWidth(5)
vbox$add(the.buttons)
the.buttons$setLayout("spread")
the.buttons$setSpacing(40)
buttonOK = gtkButtonNewFromStock("gtk-ok")
gSignalConnect(buttonOK, "clicked", performStatistics)
the.buttons$packStart(buttonOK,fill=F)
buttonCancel = gtkButtonNewFromStock("gtk-close")
gSignalConnect(buttonCancel, "clicked", window$destroy)
the.buttons$packStart(buttonCancel,fill=F)
The performStatistics function
This function, called by clicking on “OK”, should:
- import the data from the specified file;
- search for numerical variables in this data and return an error message if none of the variable is numerical
-
run
WhatMyTeacherWantson numerical variables - print the results on a new window. This new window has two buttons: one, “OK”, is used to come back to the previous window and the second one, to definitively quit the GUI
On the iris dataset example, this gives
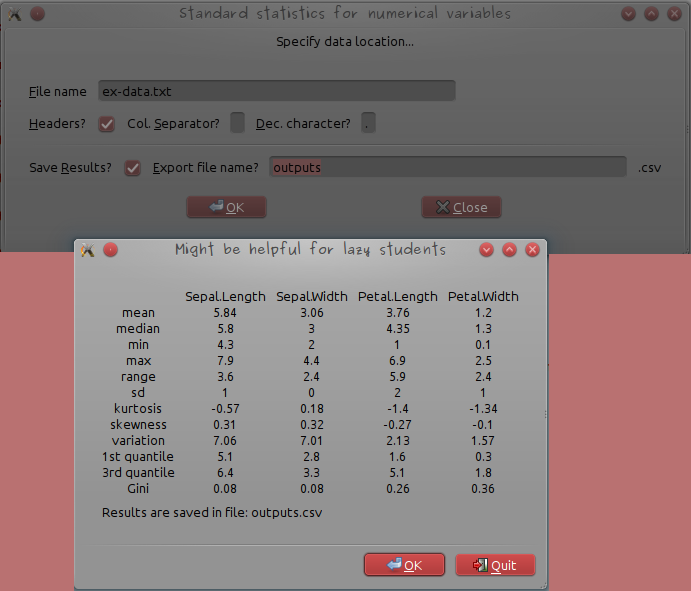
where the example data file’s name ex-data.txt was written (the file is located in the working directory), the column seperator changed to ” ” (white space) and the “Save results?” checkbox activated before the “OK” button was clicked. The results are given in a simple table and an additional message indicating that they have been saved, is also printed.
The dialog box is made by
dialog = gtkDialogNewWithButtons("Might be helpful for lazy students",window, "modal","gtk-ok", GtkResponseType["ok"],"gtk-quit", GtkResponseType["cancel"])
that contains the window’s title “Might be helpful for lazy students”, the parent window’s name “window”, the option “modal” meaning that the machine will wait for the user’s answer (“OK” or “quit”), and the buttons that will be displayed at the end of the box. Actions corresponding to these buttons are specified by
response = dialog$run()
# Return to previous window
if (response == GtkResponseType["ok"]) {
	dialog$destroy()
}
# Quit all windows
if (response == GtkResponseType["cancel"]) {
	dialog$destroy()
	window$destroy()
}
The full code of the function performStatistics is in the file GraphicalInterface.R of the tutorial material (tar.gz archive that contains the WhatMyTeacherWants function, the example data file and the GUI code, written as a function). The function performStatistics has to be sourced before the function gSignalConnect(buttonOK, "clicked", performStatistics) of the main windows is called. Once the files unpacked, the script can be tested by:
library(RGtk2)
library(e1071)
library(ineq)
source("WhatMyTeacherWants.R")
source("GraphicalInterface.R")
calculateGUI()
and fill the form as in the following picture:
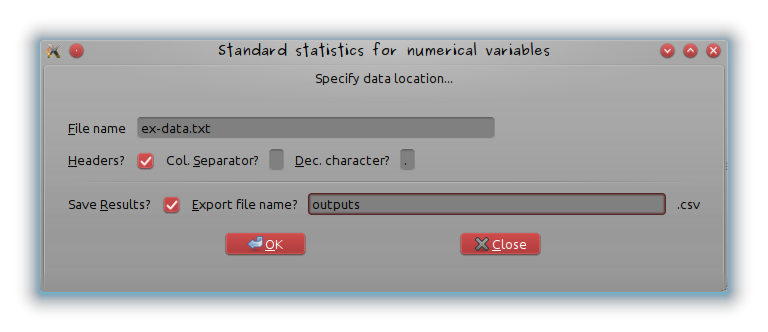
If the data do not contain at least one numerical variable, the following error message appears:
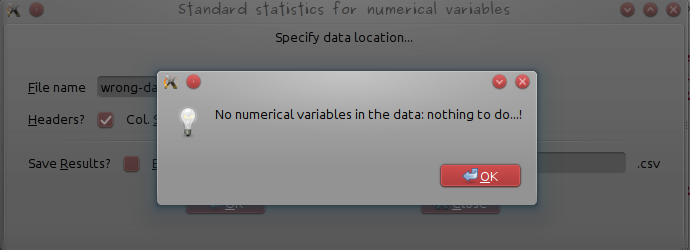
(use wrong-data.csv provided in the tutorial material for a test).
Disclaimer
To be perfectly honest, I was not really seeking at making lazy students’ life easier. My original purpose was to build a graphical interface to help geologists (and especially those from the famous NiLeDAM family) estimate the age of monazite from various elements concentration (though Dam would certainly prefer the use of the method described at this link). It’s also done 😉
Réparer « Une erreur a empêché la sauvegarde » dans roundcubeFixing “An error occured while saving” in roundcube
Après mise à niveau de mon serveur Ubuntu de la version 10.04 à 12.04, une erreur apparaît lors de l’utilisation du webmail roundcube à l’enregistrement des contacts et des identités. Ce tutoriel explique comment identifier et réparer le problème.
After having updated my Ubuntu server from 10.04 version to 12.04 version, an error occurred while trying to save contacts and identities in the webmail roundcube. This tutorial explains how to find out what the problem is and how to fix it.
Erreur à l’enregistrement d’un contact dans le carnet d’adresses
Après avoir édité un nouveau contact, l’action d’enregistrement déclenche le message d’erreur suivant :
Une erreur a empêché la sauvegarde
La recherche de la source de cette erreur peut être faite en regardant les log de roundcube :
tail -f /var/log/roundcube/errors
où on voit apparaître des lignes du type
[21-Aug-2012 07:52:12 UTC] MDB2 Error: no such field (-19): _doQuery: [Error message:
  Could not execute statement]
[Last executed query: INSERT INTO contacts (user_id, changed, del, `vcard`, `name`,
  `email`, `firstname`, `surname`, `words`) VALUES ...
  [Native code: 1054] [Native message: Unknown column 'words' in 'field list']
qui indique que le champ “words” n’existe pas dans la table “contact” de la base de données de roundcube. En démarrant le serveur SQL (ou par le biais de PhpMyAdmin si il est installé), on corrige le problème en insérant le champ dans la table
ALTER TABLE `contacts` ADD `words` VARCHAR( 500 ) NULL DEFAULT NULL
Erreur à l’ajout d’une nouvelle identité
L’insertion d’une nouvelle identité produit la même erreur. Une méthodologie similaire permet d’identifier que le champ “changed” est manquant dans la table “identitities”
ALTER TABLE `identities` ADD `changed` DATETIME NOT NULL DEFAULT '1000-01-01 00:00:00'
  AFTER `identity_id`
Error while saving a contact in the addressbook
While trying to save a new contact, I obtain the following message:
An error occured while saving
The error is more precisely described in roundcube’s log files:
tail -f /var/log/roundcube/errors
where the following lines can be found
[21-Aug-2012 07:52:12 UTC] MDB2 Error: no such field (-19): _doQuery: [Error message:
  Could not execute statement]
[Last executed query: INSERT INTO contacts (user_id, changed, del, `vcard`, `name`,
  `email`, `firstname`, `surname`, `words`) VALUES ...
  [Native code: 1054] [Native message: Unknown column 'words' in 'field list']
This indicates that the field “words” does not exist in the table “contact” in roundcube’s database. Using SQL server (or PhpMyAdmin if it is installed), this error can be fixed by inserting the missing field:
ALTER TABLE `contacts` ADD `words` VARCHAR( 500 ) NULL DEFAULT NULL
Error while adding a new identity
Trying to save a new identity resulted in the same error message. Once again, it comes from a missing field (“changed” is missing in the table “identities”)
ALTER TABLE `identities` ADD `changed` DATETIME NOT NULL DEFAULT '1000-01-01 00:00:00'
  AFTER `identity_id`
Installation et configuration de sieve pour filtrer les emails
Ce tutoriel explique comment installer et configurer le plugin sieve pour le filtrage automatique des emails sur un serveur mail postfix/dovecot installé sur une distribution Ubuntu serveur 12.04.
Pré-requis : Installation du serveur mail et mise à jour pour Ubuntu 12.04.
La première étape consiste à installer le paquet contenant le plugin sieve pour dovecot : ce plugin n’est pas disponible dans l’installation de base de dovecot :
sudo apt-get install dovecot-sieve
En super-utilisateur, on édite ensuite le fichier /etc/dovecot/dovecot.conf :
-
pour demander à dovecot d’utiliser sieve, on modifie la section
protocol ldaprotocol lda { auth_socket_path = /var/run/dovecot/auth-master log_path = mail_plugins = sieve postmaster_address = tuxette@domain-name.com } -
puis on précise l’emplacement du fichier de règles (je n’utiliserai, dans la suite, que le fichier global
sieve_global_pathqui applique les mêmes filtres pour tous les utilisateurs :plugin { sieve = /home/mail/%d/%n/Maildir/.dovecot.sieve sieve_dir = /home/mail/%d/%n/Maildir/sieve sieve_global_path = /home/mail/sieve.default }
Sous l’utilisateur mailuser on édite enfin le fichier /home/mail/sieve.default pour faire un essai de règle :
sudo su mail
cd /home/mail
nano sieve.default
dans lequel on copie, par exemple, la règle suivante :
require ["fileinto"];
if header :contains "subject" ["[SPAM]", "[MESSAGE MARQUE SPAM]"] {
  fileinto "Junk";
} else {
  keep;
}
qui déplacera les messages contenant [SPAM] et [MESSAGE MARQUE SPAM] dans la boîte “Junk” (la boîte aux lettres doit avoir été préalablement créée dans /home/mail/%d/%n/Maildir). D’autres exemples de règles de filtrage peuvent être trouvés à ce lien.
En guise d’essai, envoyez vous un message à une des adresses de votre serveur mail. Le fichier de log doit alors contenir une ligne du type
Aug 19 17:40:09 SERVER dovecot: lda(tuxette@domain-name.org): sieve: msgid=<xxxxx>: stored
mail into mailbox 'Junk'
et le message doit avoir été stocké dans la boîte “Junk”.
Ubuntu/Kubuntu 12.04 LTS (Precise Pangolin)Ubuntu/Kubuntu 12.04 LTS (Precise Pangolin)
Journal d’installation de/de mise à niveau vers la version 12.04 de (K)Ubuntu, Precise Pangolin…
Trois journaux : Installation à blanc de Kubuntu 12.04, upgrade de Kubuntu sur un ordinateur de bureau depuis 11.10 et upgrade de Ubuntu server depuis 10.04 LTS
Installation neuve sur Asus Eee PC 1225B
Les informations concernant l’installation sur cet ordinateur portable de la version 12.04 sont consultable sur la documentation francophone de Ubuntu. L’installation avec le livecd (netinstall) se déroule sans problème : pas de problème de pilote à signaler. Comme précisé sur la documentation Ubuntu, la mise en veille ne fonctionne pas après installation. La solution proposée sur la page permet d’y remédier ; il suffit de modifier ou de créer le fichier /etc/pm/sleep.d/20_custom-ehci_hcd
sudo nano /etc/pm/sleep.d/20_custom-ehci_hcd
en remplaçant son contenu par :
#!/bin/sh
#inspired by http://art.ubuntuforums.org/showpost.php?p=9744970&postcount=19
#...and http://thecodecentral.com/2011/01/18/fix-ubuntu-10-10-suspendhibernate-not-working-bug
# tidied by tqzzaa 🙂

VERSION=1.1
DEV_LIST=/tmp/usb-dev-list
DRIVERS_DIR=/sys/bus/pci/drivers
DRIVERS="ehci xhci" # ehci_hcd, xhci_hcd
HEX="[[:xdigit:]]"
MAX_BIND_ATTEMPTS=2
BIND_WAIT=0.1

unbindDev() {
  echo -n > $DEV_LIST 2>/dev/null
  for driver in $DRIVERS; do
    DDIR=$DRIVERS_DIR/${driver}_hcd
    for dev in `ls $DDIR 2>/dev/null | egrep "^$HEX+:$HEX+:$HEX"`; do
      echo -n "$dev" > $DDIR/unbind
      echo "$driver $dev" >> $DEV_LIST
    done
  done
}

bindDev() {
  if [ -s $DEV_LIST ]; then
    while read driver dev; do
      DDIR=$DRIVERS_DIR/${driver}_hcd
      while [ $((MAX_BIND_ATTEMPTS)) -gt 0 ]; do
          echo -n "$dev" > $DDIR/bind
          if [ ! -L "$DDIR/$dev" ]; then
            sleep $BIND_WAIT
          else
            break
          fi
          MAX_BIND_ATTEMPTS=$((MAX_BIND_ATTEMPTS-1))
      done
    done < $DEV_LIST   fi   rm $DEV_LIST 2>/dev/null
}

case "$1" in
  hibernate|suspend) unbindDev;;
  resume|thaw)       bindDev;;
esac
Le fichier doit ensuite être rendu exécutable par
sudo chmod 755 /etc/pm/sleep.d/20_custom-ehci_hcd
Fix it! Problème non résolu : Le clavier et le pavé tactile se bloquent au démarrage ou en sortie de mise en veille de façon aléatoire. Il suffit de redémarrer…
Mise à niveau de Kubuntu 11.10 vers Kubuntu 12.04 sur HP Compaq dc5800
La mise à niveau vers Kubuntu 12.04 fut laborieuse :
- pas de problème particulier rencontré lors de l’exécution de l’utilitaire de mise à niveau mais, au redémarrage de l’ordinateur…
-
les commandes
sudo apt-get update
sudo apt-get upgrade
renvoient l’erreur suivante :
E: Dépendances manquantes. Essayez d'utiliser l'option -f.
L’exécution de
sudo apt-get upgrade -f
ou de
sudo apt-get install -f
renvoient l’erreur
E: Internal Error. No file name for libgcc1
Les commandes suivantes permettent de régler le problème de
libgcc1:sudo dpkg -i /var/cache/apt/archives/gcc-4.6-base* sudo dpkg --configure -a sudo apt-get install -f sudo apt-get upgrade -f sudo apt-get upgrade -f
(en ignorant les erreurs rencontrées dans les diverses étapes). Une dernière erreur persiste :
Les paquets suivants contiennent des dépendances non satisfaites :
vlc : Dépend: vlc-nox (= 2.0.1-4) mais 1.1.12-2~oneiric1 est installé
vlc-data : Casse: vlc-nox (< 2.0.1-3) mais 1.1.12-2~oneiric1 est installé vlc-nox : Dépend: libvlccore4 (>= 1.1.0) mais il n'est pas installable
vlc-plugin-notify : Dépend: vlc-nox (= 2.0.1-4) mais 1.1.12-2~oneiric1 est installé
vlc-plugin-pulse : Dépend: vlc-nox (= 2.0.1-4) mais 1.1.12-2~oneiric1 est installé
E: Dépendances manquantes. Essayez d'utiliser l'option -f.
La solution est identique à la précédente :
sudo dpkg -i /var/cache/apt/archives/vlc*
sudo dpkg --configure -a
sudo apt-get install -f
sudo apt-get upgrade -f
-
Les mises à jour de sécurité importantes, qui demandent l’installation de nouveau packages, génèrent d’autres problèmes de dépendances non satisfaites qui sont, in fine, toutes résolues par des
sudo apt-get upgrade -f. -
Les dépôts désactivés lors de la mise à niveau:
-
En éditant le fichier
/etc/apt/sources.listen super-utilisateur, je dé-commente les dépôts désactivés pour la mise à jour (pour moideb http://ubuntusatanic.org/helletdeb http://deb.torproject.org/torproject.orget lance la mise à niveau avecsudo apt-get update sudo apt-get upgrade
-
Je mets à jour les dépôts ppa désactivé pour la mise à niveau : dans le répertoire
/etc/apt/sources.list.dse situent un certain nombre de dépôts ppa installé manuellement. On retrouve pour chacun de ces dépôts, le fichier initial dans lequel le dépôt mis à niveau est présent mais commenté et un fichier copie, qui se termine par.distUpgradequi correspond à la version précédente du dépôt et qui est effective. Par exemple, pour le ppadropbox, j’édite le fichierdropbox.listet je dé-commente la ligne présente puis j’édite le fichierdropbox.list.distUpgradeet je commente la ligne présente. Je termine parsudo apt-get update sudo apt-get upgrade
puis je peux supprimer définitivement le fichier
dropbox.list.distUpgradesi aucune erreur n’est rencontrée.</li> </ul> </li> -
Je terminer la mise à niveau par
sudo apt-get autoremove sudo apt-get clean
</ul>
- Sauvegarde des données importantes !
-
Mise à jour de la distribution Ubuntu Server 10.04 avec
sudo apt-get update
sudo apt-get upgrade
et redémarrage du serveur :
sudo reboot.</li> -
Installation de l’utilitaire de mise à niveau :
sudo apt-get install update-manager-core
et édition du fichier de configuration
/etc/update-manager/release-upgradespour régler l’optionPrompt=lts.</li> -
Lancement de la mise à niveau :
do-release-upgrade -d
et suivre les instructions à l’écran. Des fichiers de configuration modifiés manuellement sont mis à jour pendant l’upgrade. Pour chacun, l’utilisateur doit choisir entre le fichier modifié et sa nouvelle version. Mes choix ont été les suivants :
-
/etc/mysql/my.cnf: conserver l’ancienne version ; -
/etc/initramfs-tools/initarmfs.conf: installer la nouvelle version ; -
/etc/apache2/sites-available/defaultet/etc/apache2/sites-available/default-ssl: conserver l’ancienne version ; -
/etc/php5/apache2: conserver l’ancienne version ; -
/etc/ssh/ssh_config: conserver l’ancienne version ; -
/etc/crontab: conserver l’ancienne version ; -
/etc/ntp.conf: conserver l’ancienne version ; -
/etc/denyhost.conf: conserver l’ancienne version ; -
/etc/dovecot/dovecot.conf: conserver l’ancienne version (Attention ! Ceci génère des problèmes : voir plus loin…) ; -
/etc/fail2ban/jail.conf: conserver l’ancienne version ; -
/etc/default/saslauthd: installer la nouvelle version ; -
/etc/phpmyadmin/config.inc.php: installer la nouvelle version ; -
/etc/roundcube/db.inc.php: installer la nouvelle version ; -
/etc/roundcube/debian-db.php: conserver l’ancienne version ; -
/etc/roundcube/main.inc.php: installer la nouvelle version (Attention ! Ceci génère des problèmes : voir plus loin…) ; -
/etc/default/grub: installer la nouvelle version.
Ces choix ne sont pas nécessairement les meilleurs ; certains ont conduit à des problèmes de configuration que j’ai réglés manuellement. On peut juger pour chaque fichier de la différence entre les deux fichiers par utilisation de l’option “D” avant de faire un choix définitive entre les deux versions.</li>
-
-
On nettoie le système par
sudo apt-get autoremove
sudo apt-get clean
- Redémarrage du serveur… </ol>
-
Tentative de mise à jour automatiquede la configuration par
cp dovecot.conf dovecot.old
dovecot -n > dovecot-new.conf
La réponse du serveur est :
doveconf: Error: protocols: Unknown protocol: sieve
doveconf: Fatal: Error in configuration file /etc/dovecot/dovecot.conf:
protocols: Unknown protocol: sieve
-
Suppression du protocole sieve (que je n’utilise pas) et mise à jour automatique : j’édite le fichier
/etc/dovecot/dovecot.confet je remplaceprotocols = imaps managesieve
par
protocols = imaps
puis je relance
dovecot -n > dovecot-new.confqui retourne la réponse :doveconf: Warning: NOTE: You can get a new clean config file with: doveconf -n > dovecot-new.conf doveconf: Warning: Obsolete setting in /etc/dovecot/dovecot.conf:25: 'imaps' protocol is no longer supported. to disable non-ssl imap, use service imap-login { inet_listener imap { port=0 } } doveconf: Warning: Obsolete setting in /etc/dovecot/dovecot.conf:43: protocol managesieve {} has been replaced by protocol sieve { } doveconf: Warning: Obsolete setting in /etc/dovecot/dovecot.conf:44: listen=..:port has been replaced by service { inet_listener { port } } doveconf: Warning: Obsolete setting in /etc/dovecot/dovecot.conf:44: protocol { listen } has been replaced by service { inet_listener { address } } doveconf: Warning: Obsolete setting in /etc/dovecot/dovecot.conf:45: login_executable has been replaced by service { executable } doveconf: Warning: Obsolete setting in /etc/dovecot/dovecot.conf:46: mail_executable has been replaced by service { executable } doveconf: Warning: Obsolete setting in /etc/dovecot/dovecot.conf:101: ssl_ca_file has been replaced by ssl_ca = -
Les messages ne sont toujours pas délivrés correctement par dovecot, toujours à cause de sieve : le fichier
/var/log/mail.logfait apparaître l’erreur suivante :lda: Fatal: Plugin 'sieve' not found from directory /usr/lib/dovecot/modules
que je règle en éditant le fichier
/etc/dovecot/dovecot.confet en commentant les lignes suivantes :#plugin { # sieve = /home/vmail/%d/%n/Maildir/.dovecot.sieve # sieve_dir = /home/vmail/%d/%n/Maildir/sieve # }et, dans la section
protocol lda#mail_plugins = sieve (dans protocol lda)
-
À ce stade, les messages sont délivrés correctement par dovecot mais l’utilisateur ne peut pas de connecter. Les erreurs suivantes apparaissent dans le fichier
/var/log/mail.logMessage : dovecot: auth: Fatal: Unknown database driver 'mysql'
Ce problème est résolu en éditant le fichier
/etc/dovecot/dovecot.confet en commentant les lignes# userdb { # driver = passwd # }ainsi qu’en installant un nouveau paquet :
sudo apt-get install dovecot-mysql
-
Le serveur mail est alors pleinement fonctionnel à nouveau mais, pour supprimer les alertes reçues à chaque connexion SSL dans le fichier
/var/log/mail.log, du typeJul 21 14:39:45 chix dovecot: imap-login: Warning: SSL alert: where=0x4004, ret=256: warning close notify [37.8.180.238] Jul 21 14:39:45 chix dovecot: imap-login: Warning: SSL alert: where=0x4008, ret=256: warning close notify [37.8.180.238] Jul 21 14:39:45 chix dovecot: imap-login: Disconnected (no auth attempts): rip=37.8.180.238, lip=94.23.43.67, TLS Jul 21 14:39:45 chix dovecot: imap-login: Warning: SSL: where=0x10, ret=1: before/accept initialization [37.8.180.238] Jul 21 14:39:45 chix dovecot: imap-login: Warning: SSL: where=0x2001, ret=1: before/accept initialization [37.8.180.238] Jul 21 14:39:45 chix dovecot: imap-login: Warning: SSL: where=0x2001, ret=1: SSLv3 read client hello A [37.8.180.238] Jul 21 14:39:45 chix dovecot: imap-login: Warning: SSL: where=0x2001, ret=1: SSLv3 write server hello A [37.8.180.238] Jul 21 14:39:45 chix dovecot: imap-login: Warning: SSL: where=0x2001, ret=1: SSLv3 write certificate A [37.8.180.238] Jul 21 14:39:45 chix dovecot: imap-login: Warning: SSL: where=0x2001, ret=1: SSLv3 write server done A [37.8.180.238] Jul 21 14:39:45 chix dovecot: imap-login: Warning: SSL: where=0x2001, ret=1: SSLv3 flush data [37.8.180.238] Jul 21 14:39:45 chix dovecot: imap-login: Warning: SSL: where=0x2002, ret=-1: SSLv3 read client certificate A [37.8.180.238] Jul 21 14:39:45 chix dovecot: imap-login: Warning: SSL: where=0x2002, ret=-1: SSLv3 read client certificate A [37.8.180.238] Jul 21 14:39:46 chix dovecot: imap-login: Warning: SSL: where=0x2001, ret=1: SSLv3 read client key exchange A [37.8.180.238] Jul 21 14:39:46 chix dovecot: imap-login: Warning: SSL: where=0x2001, ret=1: SSLv3 read finished A [37.8.180.238] Jul 21 14:39:46 chix dovecot: imap-login: Warning: SSL: where=0x2001, ret=1: SSLv3 write change cipher spec A [37.8.180.238] Jul 21 14:39:46 chix dovecot: imap-login: Warning: SSL: where=0x2001, ret=1: SSLv3 write finished A [37.8.180.238] Jul 21 14:39:46 chix dovecot: imap-login: Warning: SSL: where=0x2001, ret=1: SSLv3 flush data [37.8.180.238] Jul 21 14:39:46 chix dovecot: imap-login: Warning: SSL: where=0x20, ret=1: SSL negotiation finished successfully [37.8.180.238] Jul 21 14:39:46 chix dovecot: imap-login: Warning: SSL: where=0x2002, ret=1: SSL negotiation finished successfully [37.8.180.238]
j’édite à nouveau le fichier
/etc/dovecot/dovecot.confet je règle l’optionverbose_ssl = no
-
Conclusion… Le fichier
/etc/dovecot/dovecot.conffonctionnel est obtenu pardovecot -n:dovecot.conf
et il est rendu fonctionnel en redémarrant dovecot :
/etc/init.d/dovecot restart
-
Installation et configuration de gitolite
Gitolite est installé par</p>sudo apt-get install gitolite
qui retourne un message d’erreur à l’installation
No adminkey given - not setting up gitolite.
Ce problème est réglé en relançant la configuration de gitolite :
sudo dpkg-reconfigure gitolite
Trois renseignements doivent être fournis :
- le nom d’utilisateur : gitolite (par exemple) ;
-
l’emplacement des dépôts :
/var/lib/gitolite/(j’ai essayé un autre emplacement/home/gitosisqui a conduit à de multiples erreurs…) ; - l’emplacement du fichier de la clé publique de l’administrateur (pour la connexion par ssh).
Ensuite, sur l’ordinateur local, il faut cloner le répertoire administrateur : la clé privée chargée, faire
git clone gitolite@server.domainname.org:gitolite-admin
Le répertoire administrateur contient un dossier
keydircontenant les clés autorisées et un dossierconfcontenant le fichier de configuration de gitolite.</li> -
Récupérer un projet gitosis dans gitolite
Les migrations automatiques décrites dans les diverses pages web ayant échouées chez moi, je décris une migration sans doute plus laborieuse mais qui a fonctionné. Supposons qu’on souhaite récupérer le projet gitprojectqui est stocké dans le répertoire/srv/gitosis/repositoris/project.git(sur le serveur) et associé aux clés utilisateur du répertoiregitosis-admin/keydir/user1etgitosis-admin/keydir/user2(sur l’ordinateur local).</p>-
Initialiser le projet
projectdans gitolite : pour cela, il faut éditer le fichier localgitolite-admin/conf/gitolite.confet ajouter les lignes suivantes :repo project RW+ = admin user1 user2Il faut également copier les clés publiques de user1 et user2 (qu’on récupère dans
gitosis-admin/keydir/user1dans le dossiergitolite-admin/keydir/user1) et les ajouter au dépôt gitolite-admin :git add keydir/user1 keydir/user2
puis mettre à jour le dépôt gitolite-admin
git commit -a git push
L’opération précédente a pour effet de créer un dossier
project.gitdans/var/lib/gitolite/repositories.</li> -
Copier le dossier
projectde gitosis dans gitolite : sur le serveur,sudo rm -rf /var/lib/gitolite/repositories/project.git sudo cp /srv/gitosis/repositories/project.git /var/lib/gitolite/repositories/project.git
puis spécifier correctement l’utilisateur et les droits :
sudo chown -R gitolite:gitolite /var/lib/gitolite/repositories/project.git sudo chmod -R og-rx /var/lib/gitolite/repositories/project.git
On peut alors cloner l’ancien dépôt gitosis à nouveau :
git clone gitolite@server.domainname.org:project
</ul> </li> </ol>
Coming soon…
</div> -
Initialiser le projet
Mise à niveau de Ubuntu Server 10.04 vers Ubuntu Server 12.04 (serveur OVH)
Mise en œuvre de la mise à niveau
Plusieurs étapes pour lancer la mise à niveau :
Correction des problèmes
Le redémarrage et la connexion SSH s’effectuent sans problème. Après redémarrage, les problèmes suivants ont été rencontrés :
Serveur mail
Le serveur dovecot ne fonctionne plus… Les messages d’erreur suivants apparaissent dans le fichier
/var/log/mail.log:SERVER postfix/pipe[10453]: 03F50656BB: to= USER@SERVER, relay=dovecot, delay=0.38, delays=0.26/0.01/0/0.11, dsn=4.3.0, status=deferred (temporary failure. Command output: doveconf: Warning: NOTE: You can get a new clean config file with: doveconf -n > dovecot-new.conf doveconf: Warning: Obsolete setting in /etc/dovecot/dovecot.conf:25 [...]
… qui vient du fait que des configurations présentent dans le fichier
/etc/dovecot/dovecot.confdont j’avais conservé l’ancienne version sur le serveur, sont maintenant devenues obsolètes. Voici les diverses étapes pour régler le problème :Serveur apache
Les logs du serveur apache renvoient une erreur :
PHP Warning:  Module 'PDO' already loaded in Unknown on line 0
PHP Warning:  Module 'pdo_mysql' already loaded in Unknown on line 0
qui est envoyée par email à l’administrateur toutes les 30 minutes. Le problème est réglé par en commentant les lignes
;extension=pdo.so
;extension=pdo_mysql.so
(avec les ; ) dans le fichier
/etc/php5/apache2/php.ini. Je m’attendais à trouver des entrées dupliquées pour ces lignes mais ça n’était pas le cas…Roundcube
Le webmail roundcube est fonctionnel mais demande de préciser le nom du serveur mail à la connexion. Pour que le serveur soit automatiquement configuré, éditer le fichier /etc/roundcube/main.inc.php et remplacer la ligne
$rcmail_config['default_host'] = '';
qui correspond à la configuration par défaut (du nouveau paquet) par
$rcmail_config['default_host'] = 'ssl://localhost:993';
Serveur Git
Le serveur Git n’est plus fonctionnel après passage de gitosis (déprécié) à gitolite. La transition est effectuée par 1/ l’installation et la configuration de gitolite et 2/ la récupération des dépôts gitosis.
-
En éditant le fichier

